TLC Sew Along Part 1 - Bodice Construction May 04 2018 1 Comment
CLICK HERE TO READ PREVIOUS INSTALLMENT - Sew Along Introduction
The Bodice of the TLC Caftan is one of the things that makes the caftan unique and flattering. The bodice is more or less fitted to the body. The Waist Insets are held close to the body by either elastic or twill tape ties, effectively holding the bodice in place and making the bodice conform to the body. NO TENT!
So let's jump right in!
Please pay attention to the note at the very beginning of the Construction details in the instructions. The note addresses how important it is to test your fabric to determine how stable the weave is on the straight of grain. The neckline is a surplice (sort of a wrap style construction). If your fabric has any "give" when you tug on it on the straight of grain, your neckline will most likely stretch out during construction and it will gap when you wear it.

If your fabric stretches when you tug on the straight of grain, you will want to stabilize the neck edge of the Bodice Front. Cut a narrow strip of interfacing, 3/8" wide will do, and fuse it along the seam line on the wrong side of the fabric.

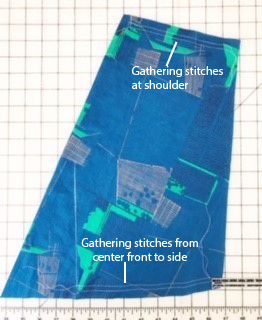
Now to the sewing machine! The first steps are simple and familiar. Stay stitch the neck edges and make gathering stitches at the waist and shoulder of the Front Bodice pieces. Start your gathering stitches 5/8" from the edge as shown. This just keeps the gathering clear of that seam.

NOTE: If you made an FBA on your Bodice Front (see previous installment Sew Along Intro) - you would stitch the newly created side dart here and press it towards the waist.
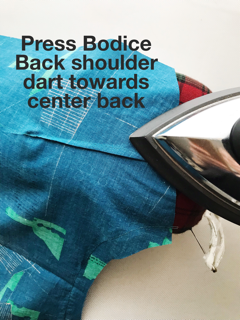
Next, the Back Bodice gets gathering stitches at the waist and darts at the shoulders (pressed towards the center back.) Start the gathering stitches 5/8" from the edge just like on the Bodice Front pieces.

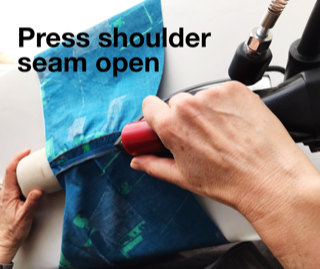
The shoulder seams are next:


Now the neck edge gets finished with bias binding.
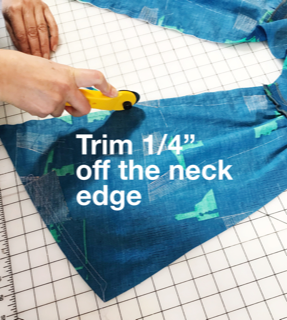
First trim 1/4" from the entire neck edge. This leaves you with a 3/8" seam allowance. The smaller seam allowance makes it easier to shape the bias to the curves.
The pattern instructions call for you to cut a bias strip from your left over fabric. We're using a contrasting fabric that shows better in the photos: a contrasting bias finish is pretty detail to add to your garment.
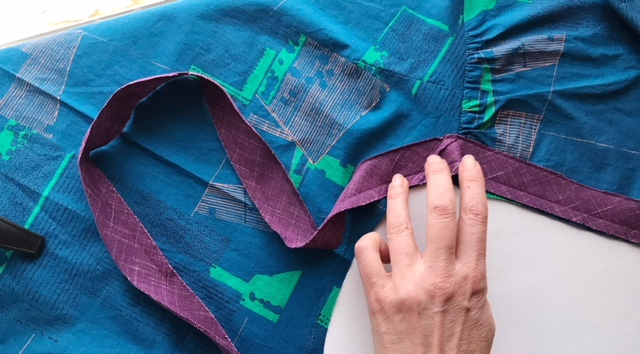
Start at the waist edge of the Bodice Front and pre-shape your bias strip by aligning the raw edges and pressing the bias tape as you go.

Shaping the bias strip neck curve is the most important part of this step and will help you have a nice smooth result. It helps to "ease" the bias tape at the sharpest part of the curve. The goal is to keep the outer edge of the bias strip nice and flat. You can kind of gather the bias tape along the inner or neck edge here as shown. Just enough to be able to keep the other edge of the bias strip flat as you go around the curve.


After you've pre-shaped the bias strip along entire neck edge, stitch it to the neck edge, right sides together.

Clip seam allowance at the curves and turn the binding to the inside.


Next you want to turn in the raw edge of the bias strip. We find it easier to turn in the raw edge here before you turn the bias strip to the inside of the bodice. 1/4" pressed in will do the job.

Now, when you turn the bias to the inside, that outer edge is already to go!

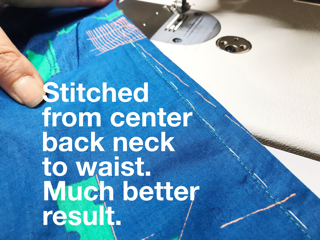
Next, stitch the bias facing in place by hand or machine. We machine stitched here for speed but got a crap result the first time.

Unpicked that hot mess and hand basted the bias facing.

Machine stitching the bias facing in place round 2 went much better. We stitched from the center back down to the waist and then repeated for the other side. Nice and smooth this time!
That's all for this installment. Next time we'll attach the Waist Insets and the Skirt Pieces.
Comments
Johanna on January 28 2019 at 10:36AM
These step-by-step tutorials are fabulous!! Thanks for including all the photos!!