Hey everyone! Thanks so much for checking out our blog and this tutorial. We are hoping the PVP construction is so straightforward there’s no problem for anyone. The waistband is the one place where someone might want some extra info so this is it!
The waistband is curved in order to conform to your body and be more comfortable and fit better than a rectangular waistband. The construction is the Waistband piece with a facing. Once attached, seam allowances of the Waistband, the facing and the pants are distributed above and below the waistband seam to minimize bulk. Yes, there is a faster, less fiddly way of doing this but this outcome is worth the little bit of extra effort!
First, sew the Center Back seam on one Waistband piece (left) and press that seam open as shown (right.)

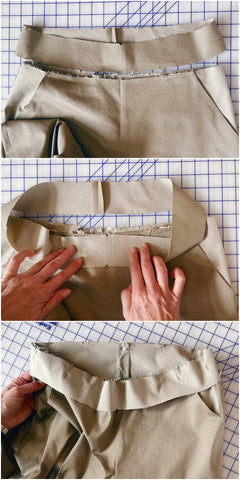
Next, the top photo shows the Waistband and the pants with the matching seam edges next to each other. The middle photo shows the Waistband flipped so that the raw edges of the Waistband and Pants are aligned with the right sides of the fabric together. Bottom photo shows the Waistband pinned to the pants and ready for stitching.

Stitch the seam (top.) Grade the seam allowance trimming Pants seam allowance to be shorter than the Waistband seam allowance (middle.) Press seam towards Waistband (bottom.)

Congratulations! Your Waistband is on; all that is left now is the Waistband facing.
Finish the bottom edge of the remaining Waistband piece however you like LEAVING THE ENTIRE SEAM ALLOWANCE INTACT! We serged the egde (top.) Next, turn the seam allowance at the center back and press (middle and bottom.)

Now you’re going to pin the Waistband facing to the pants, right sides together, matching the center front (top photo) and side notches. Make sure the folded edges at the center back of the Waistband facing abut one another as shown and are directly over the center back seam on the Waistband (middle photo.) Stitch (bottom photo.)

Grade the seam allowance making Waistband facing the shortest layer (Top and middle photo.) Press the seam open (bottom photo.) This might seem strange because you’re about to fold the Waistband facing to the inside of the pants but it makes it MUCH easier to control everything.

OK! Just a few more steps now. Flip the Waistband facing to the inside of the pants and press along the top edge (top photo.) At the center back, make sure the folded edges abut one another (middle photo.) Pin in place. You might have to pin from the inside first keeping everything flat and in position. Then, pin from the outside because you’ll be stitching from the outside (bottom photo.)

Stitch in the ditch of the waistband seam from the outside making sure you catch the facing with the stitching. You will be stitching with your narrow zigzag stitch but it shouldn’t show. Don’t worry if your stitching isn’t absolutely perfect and goes on to the waist band or the pants. Nobody’s going to see it when you’re wearing them.

Thread your elastic into the casing using a large safety pin or bodkin (top photo.) It’s going to be a snug fit but that will just keep the non-roll elastic from twisting around in the casing when you’re getting in and out of the pants. It might be difficult to distribute the pants evenly around the elastic. Don’t worry, it will eventually smooth out (middle photo.)
Once you’ve tried on the pants and determined how tight you want your elastic to be, overlap the ends as shown in the bottom photo and pin.

Now stitch the ends of the elastic together (top photo) and work it back into the casing. Stitch the two folded edges together by hand middle and bottom photos.)

That’s it! You’ve got a nice low profile waistband and it was pretty easy, right?
The pants might fit snugly when you first put them on or get them out of the wash. Most stretch woven fabric relaxes after a few hours of wear so give it a few hours before decide what you think about the fit. And speaking of relaxing, sometimes elastic can also lose its "recovery" and get looser as time goes on. Doing the waistband this way makes if much easier to get back in there to shorten up the elastic if necessary.
Thanks for making it all the way to the end!


Comments
Nellie on July 13 2023 at 09:10AM
Thanks for the helpful tutorial. For a beginner/intermediate, it helps a lot with finishing these fantastic pants that are comfortable and stylish!