Well, It's been a busy end of 2016 and a busier beginning of 2017. We are releasing THREE new Decades Of Style patterns: the Baltimore Dress, the Sugar Coat and the Isabella Dress! These 1920s inspired patterns can be made for everyday wear or lush evening wear. We have been wanting to take the time to grow our 20s pattern collection and are happy to start the new year with a small wardrobe of them. We'll talk more about our new patterns in the coming weeks, but for now we're going to focus on the first dress in this new release trio.
The Baltimore dress is a loose fitting sleeveless frock with paneling at the front hip which allows for color blocking and fun with directional prints. Lighter weight fabrics like silk chiffon or crepe, rayon, voile, handkerchief linen are recommended because of the loose fit and amount of ease in this dress. You can use medium weight cotton, but the drape will be more stiff, especially in the front skirt panel.
Unlike the E.S.P. dress, our model did not need to do a Full Bust Adjustment on this pattern as it is a loose fitting dress. We did, however, take it in at the center back to adjust for sloping shoulders and a small back width. Our model wanted a softer, slinkier look than the muslin provided which is better suited to her curvy figure.
We chose a lightweight cotton/silk print for the main part of the dress and a Robert Kaufman Radiance (cotton/silk blend) for it's drape and satin finish as the contrast. The central design detail in this pattern is the paneling in the front, the "X" if you will. This dress has a 3/8" seam allowance, which is considered generous in vintage clothes. This is to minimize bulky seams, especially at the "X".

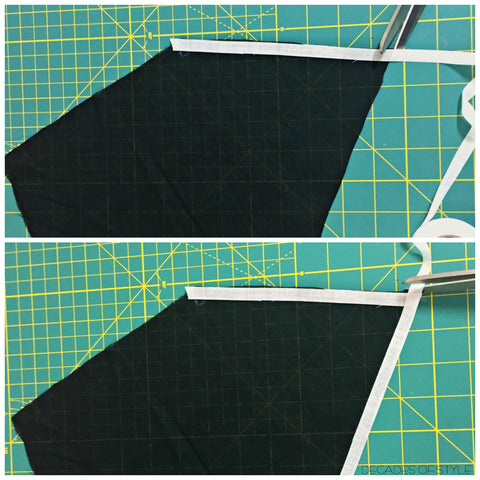
What is tricky about the "X" is the seams are all on the bias. If you are working with a stable woven, like a medium weight cotton (otherwise known as quilting cotton) the bias does not move around too much. But when you are working with a lighter weight fabric like a chiffon or a voile the fabric distort and stretch easily on the bias. Hence, the use of fusible stay tape. We recommend Design Plus' Straight Fusible Stay Tape because it comes in a 3/8" width but it is also available in black and white and on the bias (if you are going using it on necklines or armholes). It also comes in a super fine weight which is ideal for chiffon and rayon challis. You can make your own stay tape from any woven or non-woven fusible interfacing, you just have to cut thin strips. The stay tape keeps the fabric from distorting and keeps the threads from fraying. We still recommend finishing your seams, even with the stay tape.
After cutting your pattern pieces you must begin by cutting and fusing the stay tape to the seams in the "X" (Front Skirt, Side Front Skirt, Bodice) and the Front Yoke. as well as stay stitching the neckline on the Front Yoke.

If you transferred your markings onto your fabric before ironing the stay tape, check to see that they are still visible. If not, mark them again. The markings at the points are particularly important because it ensures you start and stop your stitching accurately, giving you a precise "X" with no bubbling or wonkiness.

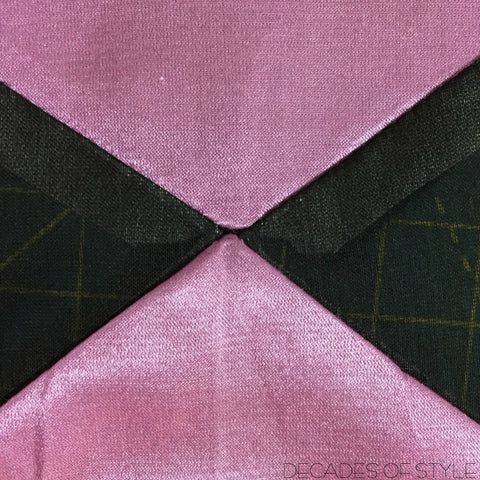
When sewing the Front Skirt to the Side Front Skirt, you must start and stop at the markings at the point. Then, when you attach the Bodice to the Side Front Skirt, do the same, taking care not to sew through the seam allowance of the side front-front skirt. The seam allowances must be left lose, not sewn to one another as it will effect the drape.

See how the seams just touch. That's what you want. Then when you press the seams and clip the necessary bits, you get a beautiful "X". The alphabet never looked so good.

Next post: using bias for a French binding of the armscye and neck.


Comments
Decades of Style on January 24 2017 at 08:59PM
Stay tuned for the upcoming installments! You will see our model in her gorgeous dress!
Colleen on January 24 2017 at 01:53PM
I’d love to see your model! I like this and it’ll be great for summers in the south!