The E.S.P. Dress is one of our most versatile patterns because once fitted, the pattern can be a base for many different variations. We have covered how to alter the gathered skirt into pleats, shorten the sleeves and even make the dress sleeveless on previous posts. Now that the weather in the Northern hemisphere has turned colder, it's a good time to hack this TNT pattern for fall and winter.
We have had a few requests on our blog regarding making the short, wide raglan sleeve into an elbow length or 3/4 sleeve. When Harts Fabrics in Santa Cruz invited us to write a guest blog tutorial for Sew Your Hart Out September, it was the perfect opportunity and venue for it! If you missed the tutorial back then, here it is!
Cotton + Steel via Harts provided us with a lovely Les Fleur Birch Floral rayon by Rifle Paper Co. This fabric is like buttuh, both the hand and drape.

To alter short sleeves into a longer sleeve using the slash and spread technique, you’ll need these supplies:
Clear 2” ruler, we like Collins’
Pattern paper - it must by transparent enough to see the printed pattern through it so tissue and architecture paper can also work
Tape
Pencil and pen
Paper scissors
Fabric for muslin/mock-ups
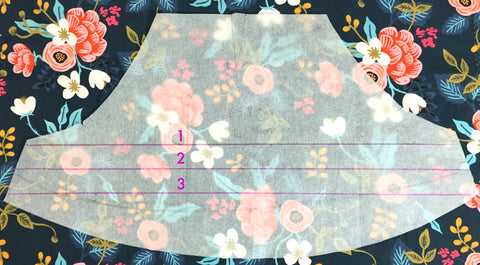
Begin by tracing the sleeve pattern in your determined size - see our post on measurements vs. muslins for more information on determining your size. Transferring all markings and cut it out. We will not be changing the armscye, so all of the pattern alteration will take place below that. To begin, use the ruler and draw a line - Line 1 - across the sleeve, perpendicular to the grain and at the bottom of the armscye.

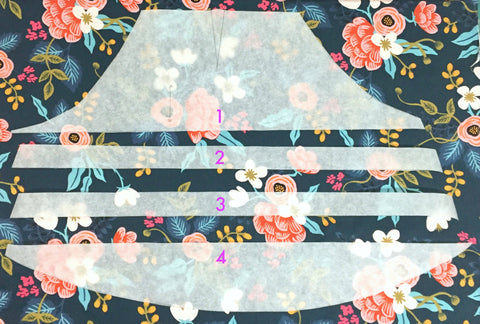
Draw two more lines 1” apart from the top line - Line 2 and 3. Line 3 should be right before the sleeve bottom begins to curve. Cut along these lines. You now have four pattern pieces. We labeled the pattern pieces 1-4 to make sure we didn’t mix them up.

Slide a piece of pattern paper underneath pieces 1-4. To determine your desired sleeve length and circumference, take measurements from any existing garment that is a good fit for you. (Measure the underarm seam for the length and the circumference of the opening at the bottom of the sleeve.) We apologize, but now you have to do math. Start with your desired finished sleeve length and subtract 3. Then divide that number by 3.
You will be inserting that amount between each section to achieve your desired length.
We spread the pieces 3 3/8” apart and taped them to the paper underneath. It is easiest to measure and tape one piece at a time. Tissue paper tears easily, so you may want to use artist rather than painter’s tape. Trim any excess paper from back and sides.

Now the pattern piece is longer but still a really wide bell sleeve. Draw a line from the sleeve dart to straight down the pattern piece past Line 1. This will be your guide to reassembling the pattern piece after you’ve tapered it. To taper the sleeve, first cut away the pattern piece at Line 1 and set aside the top section. Divide the remaining piece into five by drawing four lines approximately 4” apart that are parallel with the grain line marking.

We’ll mark these pieces alphabetically. Now things start to get fun. Now you will need your finished circumference measurement that you got from an existing garment. Measure the width of the sleeve pattern at line 4 (minus the seam allowance) and subtract the finished circumference from that. Then divide that number by 4. This gives you your overlap amount. Cut along the vertical lines separating pieces A-E, keeping 1/8” at the top uncut. Overlap the pieces at the bottom by your overlap amount. For this project we overlapped by about 2” between each section and taped them together.

On top of a new piece of paper, align the top part of the sleeve with the newly tapered bottom part of the sleeve using the line you drew as a guide. Tape down the pieces in place to the new paper so that the new paper fills in the voids created by tapering the sleeve. Trim excess paper.

To eliminate the curve at the bottom of the sleeve, draw a line that runs to each edge at the bottom. We add a piece of pattern paper that is the same width and 1” long to create the hem allowance. Flare out the hem allowance at each side to match the flare of the sleeve above.

Now it’s time to test our pattern with a quick muslin of the top. We used a lightweight rayon for our muslin. We marked on our muslin a curve at the outside elbow to make the sleeve hang more elegantly. We transferred those changes on our newly altered sleeve.

Then a last muslin to make up and check our sleeve. Perfect. Be sure to bend your arm to test the fit at the forearm. If you find you need to add a little bit of width to the sides at the forearm, slide that pattern paper under and add what you need - sometimes just a 1/4” on either side is just enough.

The E.S.P. dress comes together easily. The only changes we made to the order of sewing the dress was to hem the sleeve before attaching them to the dress. Turn up the fabric 1/2”, press, then turn up another 1/2” and press, pin and sew.

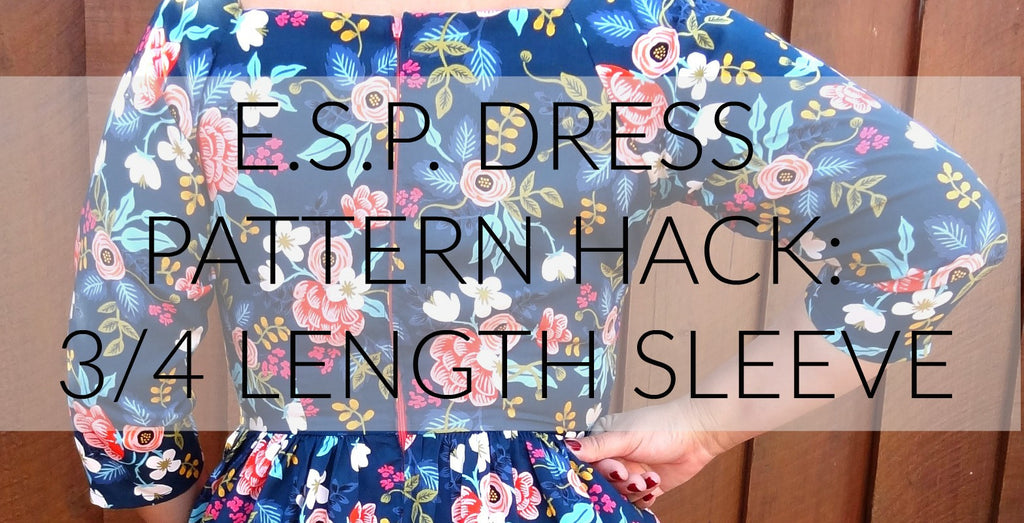
The finished dress is breath of floral prettiness! Thanks for sticking it through our long tutorial. The E.S.P. dress is really wonderfully versatile and fits even full busted beauties with proper adjustments. We did a Full Bust Adjustment and Sway Back adjustment on this E.S.P. dress as well. Details on how to do these can be found on on our E.S.P. Dress Sew Along Week 1 post. We’d like to thank Harts for letting us guest blog for giving us a chance to create this tutorial!


Comments
francesca on December 19 2016 at 06:37AM
Oooh, thank you for this! Now, stupid question time – it looks like it could be done just by drawing two straight lines down from the underarm to a designated length and sleeve width (I hate slashing and spreading because I am a nitpicking anal type and always feel my spreading is uneven even if I use a squared mat base to help) – or is that patternmaking anathema?